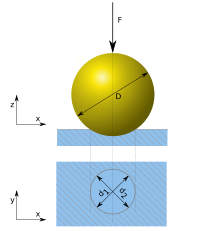
The Brinell scale (pronounced /brəˈnɛl/) measures the indentation hardness of materials. It determines hardness through the scale of penetration of an indenter, loaded on a material test-piece. It is one of several definitions of hardness in materials science. The hardness scale is expressed as the Brinell Hardness Number (BHN or BH) and was named for Johan August Brinell, who developed the method in the early 20th century.

History
editProposed by Swedish engineer Johan August Brinell in 1900, it was the first widely used and standardised hardness test in engineering and metallurgy. The large size of indentation and possible damage to test-piece limits its usefulness. However, it also had the useful feature that the hardness value divided by two gave the approximate UTS in ksi for steels. This feature contributed to its early adoption over competing hardness tests.
Test details
editThe typical test uses a 10 mm (0.39 in) diameter steel ball as an indenter with a 3,000 kgf (29.42 kN; 6,614 lbf) force. For softer materials, a smaller force is used; for harder materials, a tungsten carbide ball is substituted for the steel ball. The indentation is measured and hardness calculated as:
where:
- BHN = Brinell Hardness Number (kgf/mm2)
- P = applied load in kilogram-force (kgf)
- D = diameter of indenter (mm)
- d = diameter of indentation (mm)
Brinell hardness is sometimes quoted in megapascals; the Brinell hardness number is multiplied by the acceleration due to gravity, 9.80665 m/s2, to convert it to megapascals.
The Brinell hardness number can be correlated with the ultimate tensile strength (UTS), although the relationship is dependent on the material, and therefore determined empirically. The relationship is based on Meyer's index (n) from Meyer's law. If Meyer's index is less than 2.2 then the ratio of UTS to BHN is 0.36. If Meyer's index is greater than 2.2, then the ratio increases.[1]
The Brinell hardness is designated by the most commonly used test standards (ASTM E10-14[2] and ISO 6506–1:2005) as HBW (H from hardness, B from brinell and W from the material of the indenter, tungsten (wolfram) carbide). In former standards HB or HBS were used to refer to measurements made with steel indenters.
HBW is calculated in both standards using the SI units as
where:
- F = applied load (newtons)
- D = diameter of indenter (mm)
- d = diameter of indentation (mm)
Common values
editWhen quoting a Brinell hardness number (BHN or more commonly HB), the conditions of the test used to obtain the number must be specified. The standard format for specifying tests can be seen in the example "HBW 10/3000". "HBW" means that a tungsten carbide (from the chemical symbol for tungsten or from the Spanish/Swedish/German name for tungsten, "Wolfram") ball indenter was used, as opposed to "HBS", which means a hardened steel ball. The "10" is the ball diameter in millimeters. The "3000" is the force in kilograms force.
The hardness may also be shown as XXX HB YYD2. The XXX is the force to apply (in kgf) on a material of type YY (5 for aluminum alloys, 10 for copper alloys, 30 for steels). Thus a typical steel hardness could be written: 250 HB 30D2. It could be a maximum or a minimum.
| Hardness symbol | Diameter of Indenter
mm |
F/D2 | Test force
N/kgf |
|---|---|---|---|
| HBW 10/3000 | 10 | 30 | 29420(3000) |
| HBW 10/1500 | 10 | 15 | 14710(1500) |
| HBW 10/1000 | 10 | 10 | 9807(1000) |
| Material | Hardness |
|---|---|
| Softwood (e.g., pine) | 1.6 HBS 10/100 |
| Hardwood | 2.6–7.0 HBS 10/100 |
| Lead | 5.0 HB (pure lead; alloyed lead typically can range from 5.0 HB to values in excess of 22.0 HB) |
| Pure Aluminium | 15 HB |
| Copper | 35 HB |
| Hardened AW-6060 Aluminium | 75 HB |
| Mild steel | 120 HB |
| 18–8 (304) stainless steel annealed | 200 HB[3] |
| Quenched and tempered steel wear plate | 400-700 HB |
| Hardened tool steel | 600–900 HB (HBW 10/3000) |
| Glass | 1550 HB |
| Rhenium diboride | 4600 HB |
| Note: Standard test conditions unless otherwise stated | |
Standards
edit- International (ISO) and European (CEN) Standard
- "EN ISO 6506-1:2014: Metallic materials – Brinell hardness test – Part 1: test method".
- "EN ISO 6506-2:2017: Metallic materials – Brinell hardness test – Part 2: verification and calibration of testing machine".
- "EN ISO 6506-3:2014: Metallic materials – Brinell hardness test – Part 3: calibration of reference blocks".
- "EN ISO 6506-4:2014: Metallic materials – Brinell hardness test – Part 4: Table of hardness values".
- US standard (ASTM International)
See also
editReferences
edit- ^ Tabor 2000, p. 17.
- ^ ASTM E10-14.
- ^ "AISI Type 304 Stainless Steel". ASM Material Data Sheet. n.d. Archived from the original on 1 October 2018. Retrieved 28 May 2019.
- Tabor, David (2000). The Hardness of Metals. Oxford University Press. ISBN 0-19-850776-3.
External links
edit- Brinell Hardness Test – Methods, advantages, disadvantages, applications
- Video on the Brinell hardness test on YouTube
- Rockwell to Brinell conversion chart (Brinell, Rockwell A,B,C)
- Struers hardness conversion table (Vickers, Brinell, Rockwell B,C,D)
- Brinell Hardness HB conversion chart (MPa, Brinell, Vickers, Rockwell C)